The Grower’s Guide to Plant Sap Analysis
6 Mistakes to Avoid When Starting Sap Analysis
It’s a common story.
You’re intrigued with the potential of sap testing.
You’re excited to jump right in make your plants resistant to pests and disease.
“How do I get started?!”
I’ve spent six years using sap testing with various growers across various crops. I’m sharing the six mistakes I’ve made so you don’t have to do the same.
1. Not Tissue Testing First
By far the lowest hanging fruit in nutrient management is TISSUE TESTING.
Tissue testing is an inexpensive and time-tested technique with established crop targets for almost every major horticultural crop.
I like to say “the plant doesn’t lie”. No matter what is happening in the soil or environment, the leaves tell the final story of nutrient status. A tissue test measures 100% of the nutrients up-taken in the leaves to that point in time.
Tissue tests are fairly easy to interpret and usually guide nutrient management better than any other tool in the toolbox, including soil tests.
I recommend a single tissue test every season at a minimum.
For growers of high-value crops, a tissue test every two weeks is ideal. Here are a few guidelines on the ideal testing interval for common high-value crops:
Canna: every two weeks until Week 2 or 3 of Flower (starting when there is enough leaf tissue to test)
Tree Fruit: every three to four weeks until fruit is about golfball-size (starting when there is enough leaf tissue to test)
Tomatoes and Peppers: every two weeks until fruit ripening (starting when there is enough leaf tissue to test)
Wine Grapes: every two weeks until late summer (before fruit ripening)
If you spend any money at all on nutrition, it makes sense to get at least a single tissue test for guidance.
It’s the highest-ROI, easiest, and least expensive first step in nutrition management. Don’t skip this step.
If you’re still interested in sap testing, use the sap data to supplement your tissue testing. Do the two different tests tell the same story?
Often sap can give new insights, especially since it provides data on nitrate, ammonium, silicon, and molybdenum that are not tested on tissue tests.
2. When Sap Analysis Does Not Help with Nutrient Management
Plant sap analysis is for growers willing to invest in optimizing crop health and nutrient management with a mindset of abundance, not scarcity.
Plant sap analysis is NOT for growers who are trying to minimize all expenses at all costs.
Plant sap analysis is for growers comfortable with increasing expenses in the name of increasing profitability. This should be the mindset if you cultivate a crop species where a 5% improvement in quality or yield will produce an increase in profitability greater than several thousand dollars. It’s for those who understand that a precision approach can ultimately reduce nutrient costs over time, but requires an up-front investment in your operation.
Therefore, plant sap analysis is NOT for home gardeners, small polyculture growers, or crops where increased profitability won’t justify the cost of ongoing testing.
Plant sap analysis is for optimizing crop nutrition over time. Not one time.
Plant sap analysis is NOT for identifying a one-time nutrient deficiency or those who want a yearly plant nutrient test. Tissue testing is far better for this purpose.
Plant sap analysis should only be used by those who have the ability to make a quick nutrient application - fertigation, topdress, or foliar - after receiving the results of the test.
Plant sap analysis should NOT be used if you don't have someone who can help you analyze the results. Note: I've had very bad experience with the labs doing the recommendations! Much more on that below.
3. Choosing the Wrong Plant Sap Lab
Choosing the wrong lab can be a huge mistake if you have to change labs after establishing a valuable dataset for your operation. Choosing the right lab from the start is essential.
I say this because I’ve made this mistake. Twice.
I am sharing this to help other’s avoid the same set of mistakes.
There are only a few labs offering plant sap analysis for North American growers:
Nova Crop Control (send through Crop Health Labs)
New Age Labs
Apical Labs
Having used all of these labs fairly extensively over the past six years, I’ll talk through what I’ve learned about each of them.
Nova
If you are growing a high-value crop (tree fruit, berries, grapes, tomatoes), the most established and legitimate sap lab is probably Nova Crop Control. They have the best dataset, best targets, and most reliable results. They also have the longest history of operation.
Unfortunately, Nova does not accept cannabis leaves. If you want to sap test with cannabis, your best bet is New Age Lab in Michigan. But again, this is only the best route if you’ve fully exhausted all the improvements possible from tissue testing.
While it’s located in the Nederlands, shipping isn’t difficult. Reach out to “Crop Health Labs” for sampling guides, protocols, and labels. Crop Health Labs aggregates samples and ships them on ice to the Nederlands. They ship samples on Tuesday and Friday. I’ve found that if I ship my samples to Crop Health Labs on Tuesday at 3pm via USPS flat rate (only ~$9), I’ll have results by Tuesday the following week.
My suggestion is to send your first sample to Crop Health Labs on Monday via USPS flat rate and an ice pack. Track shipping and see what day it arrives. Adjust what day you ship your samples based on when it arrives to Crop Health Labs, aiming to get the arrival time as close to Tuesday or Friday at noon central time.
You’ll have results within a week.
New Age
New Age Labs is very easy to work with. They utilize a seemingly large database of optimal ranges. The turnaround time is very fast, and they have extensive experience in environmental analysis and laboratory protocols going back to the 1980’s.
New Age has been the most transparent about how they define sap and extract it, making them trustworthy and helpful in the interpretation.
If you’re a cannabis grower who wants to sap test, I’d suggest using New Age to supplement your tissue testing regimen. Get them done at the same time and send me the results for analysis.
Apical
Apical Labs technically does “Leaf Extract Analysis”, not sap analysis. They are not transparent with their extraction process, so it’s anyone’s guess as to what they’re actually extracting and testing. Growers have reported that their recommendations miss the mark, pointing to things like “excess chloride” and various nutrient antagonisms that seem more rooted in product sales rather than the science of plant physiology. [Aside: Chloride is an essential anion in plants in higher concentrations than you’d think. It’s critical for ionic balance and osmotic adjustment. Don’t chase your tail trying to balance chloride unless you’re using chloride fertilizers that can cause toxicity - let the plant do this on it’s own!] While I’ve worked with Apical Labs in the past, I’ve struggled with slow turnaround times and unreported changes in their testing procedures that lead to 6x changes in reported levels of certain nutrients. This type of change instantaneously makes all past data and baselines worthless, and would never happen with a ISO certified laboratory. Questions are difficult to get answered and the sap reports seem to act more as customer acquisition for the product arm of their company.
Laboratory Side-By-Side Test
In 2024, I did a side-by-side experiment between these three labs. I pulled a very large sample of Red Haven peaches, split it into three samples, and sent it to all three labs for a comparison.

The numbers vary widely—sometimes by an order of magnitude.
So instead of focusing on the net numbers, I compared my results to each lab’s ideal ranges that they provide:

There seemed to be frequent discrepancies between the labs on what nutrients were considered were low vs high.
Finally, I decided to use a tissue test as my “source of truth”. I honed in on the most obvious nutrients that were critically high and low in my tissue results, which I’ve also observed visually in the crop.

Here, you can see that all the sap lab results correlated very well with the critical findings from the tissue test. This tells me two things:
Tissue testing is the simplest and most cost-effective way to identify the most obvious nutrient excesses and deficiencies. Always start with tissue!
Even though sap labs often differ in their conclusions, they are generally accurate enough when it comes to the most critical excesses and deficiencies. The deficient nutrients (Ca, S, and Fe) were all extremely low in the sap results for Nova and New Age, giving me confidence in the results that are far out-of-range. I have much less confidence in managing nutrients slightly out of range on a sap test.
4. Misinterpreting Results
Unfortunately, plant sap analysis has not been studied nearly as much as tissue analysis. There are established tissue targets for various crops, making interpretation easy.
Sap is far more complicated.
Sap needs to be analyzed in three ways:
The gradient between new and old growth. The optimal gradient changes based on the ion.
The balance of cations (and anions). This matters a lot, especially for addressing things like Bitter Pit in apples.
The net level of nutrient ions (aka “sufficiency” or “excess”)
If you need help interpreting a sap test, I’m happy to help interpret them alongside a Tissue Analysis. I don’t do stand-alone sap recommendations without additional context.
To dive into interpretation a bit more…
Gradient
A balanced gradient between new and old growth is especially helpful in determining “pending hunger” of mobile nutrients such as N, P, K, S, and Mg. When I see a steep gradient showing a higher concentration in the new growth vs the old growth, this indicates that the leaf is beginning to translocate minerals to help supply the new expanding plant parts. Old leaves act as a source of nutrients, while young leaves act a sink. When old leaves start getting exhausted, the gradient shows it loud and clear.
And Vice Versa. Ca and B are completely immobile nutrients. A steep gradient showing more Ca in the old growth vs the new growth indicates the plant may be experiencing Ca hunger.
*Note: this metric completely depends on net quantities as well.
All of the other trace minerals (Fe, Cu, Mn, Zn, Mo, I, Si) are primarily IMMOBILE. While a few of them are “somewhat mobile” according to textbooks, they should be treated as immobile when interpreting the gradient.
I’ve found that the gradient interpretation for plant sap analysis is most helpful in analyzing N, P, K, and Ca.
I’ve also found that a sharp gradient can simply result from pulling leaves that are too immature - more on that below.
Cation/Anion Balance
Major cations are highly antagonistic in the soil. Certain deficiencies in cations are often created by the over-abundance of another.
The same relationship exists within the plant.
It is common that too much potassium or magnesium causes calcium deficiency, which is not from a lack of Ca in the soil. Achieving healthy cation balance in the plant is critical.
Bitter pit in apples is worsened when there is unregulated absorption of potassium, leading to potassium concentrations in plant sap high enough to inhibit calcium flow into the developing fruit embryo.
Anion balance is the same. Phosphate, nitrate, chloride, and sulfate all show up in varying concentrations. Chloride and sulfate will always dominate a sap test due to their critical role in maintaining charge balance in the plant. Nitrate should never accumulate too much since the nitrate reductase pathway should convert nitrate into amino acids every 24 hours with the presence of sufficient molybdenum and sulfur. (This is the only essential role of Mo in the plant, by the way.)
One of the greatest benefits of sap analysis is nitrogen management: ensuring that the nitrate reductase pathway is indeed working at max efficiency.
Net Levels
While gradients and balance are alluring ideas, net levels still matter the most.
If there is only 0.5 ppm of Iron in the old growth of tomatoes, and 0.75ppm of Iron in the new growth, it doesn’t matter what the gradient is. Those levels are simply too low! Sufficiency should come before balance, always.
All sap labs now provide generalized target numbers. This is often a good place to start.
What About Brix, EC, and pH?
In my opinion, sugars, EC, and sap pH tend to be unhelpful metrics for determining plant status and management actions. There is no doubt they provide additional information about plant physiology. However, I don’t believe they are straight-forward enough to change a management decision.
Why?
Sugars/Brix
When a plant is experiencing drought, frost, or salt stresses (all osmotic stresses), it turns starch into sugar. This lowers the plant's osmotic potential, which attracts more water into the plant. It's a brilliant design mechanism. The plant changes its solute concentration to adapt to its environment.
(This is why winter vegetables often taste sweeter after they experience a period of frost, which is really osmotic stress.)
Cells can also regulate osmotic potential by breaking down compounds into smaller solutes or combining them into larger compounds, called osmotic adjustment.
Another example is how sucrose concentration varies from night to day due to photosynthesis (especially in C4 and CAM plants).
The point is this: none of these natural plant mechanisms have to do with plant health. But they all change the brix. A lot!
pH
For years I’ve heard people confidently proclaim that sap pH will forecast disease susceptibility at low readings and insect susceptibility at higher readings. (Or something like that).
Is there any evidence of this?
After an exhaustive search, I can confidently say “none whatsoever”.
EC
Honestly, I don’t know what EC says about plant status.
I put it in a similar category to pH. That is, the plant has complex mechanisms to change the cytosolic conductivity, which I assume is primarily influenced by plant water status and not general health.
Some people claim low EC is often caused by excess Phosphorous, Sulfur, compacted soils or low soil pH. High EC (> 18 mS/cm) is often caused by excess Nitrate, Potassium, loose soils, high soil pH.
Again, I have not found evidence for any of this, nor have I found it mentioned in any textbooks or scientific papers.
5. Poor Sample Collection
The greatest variability in results comes from poor SAMPLING, not laboratory techniques. Whatever lab you use, follow their protocols carefully.
Here are some general tips across labs:
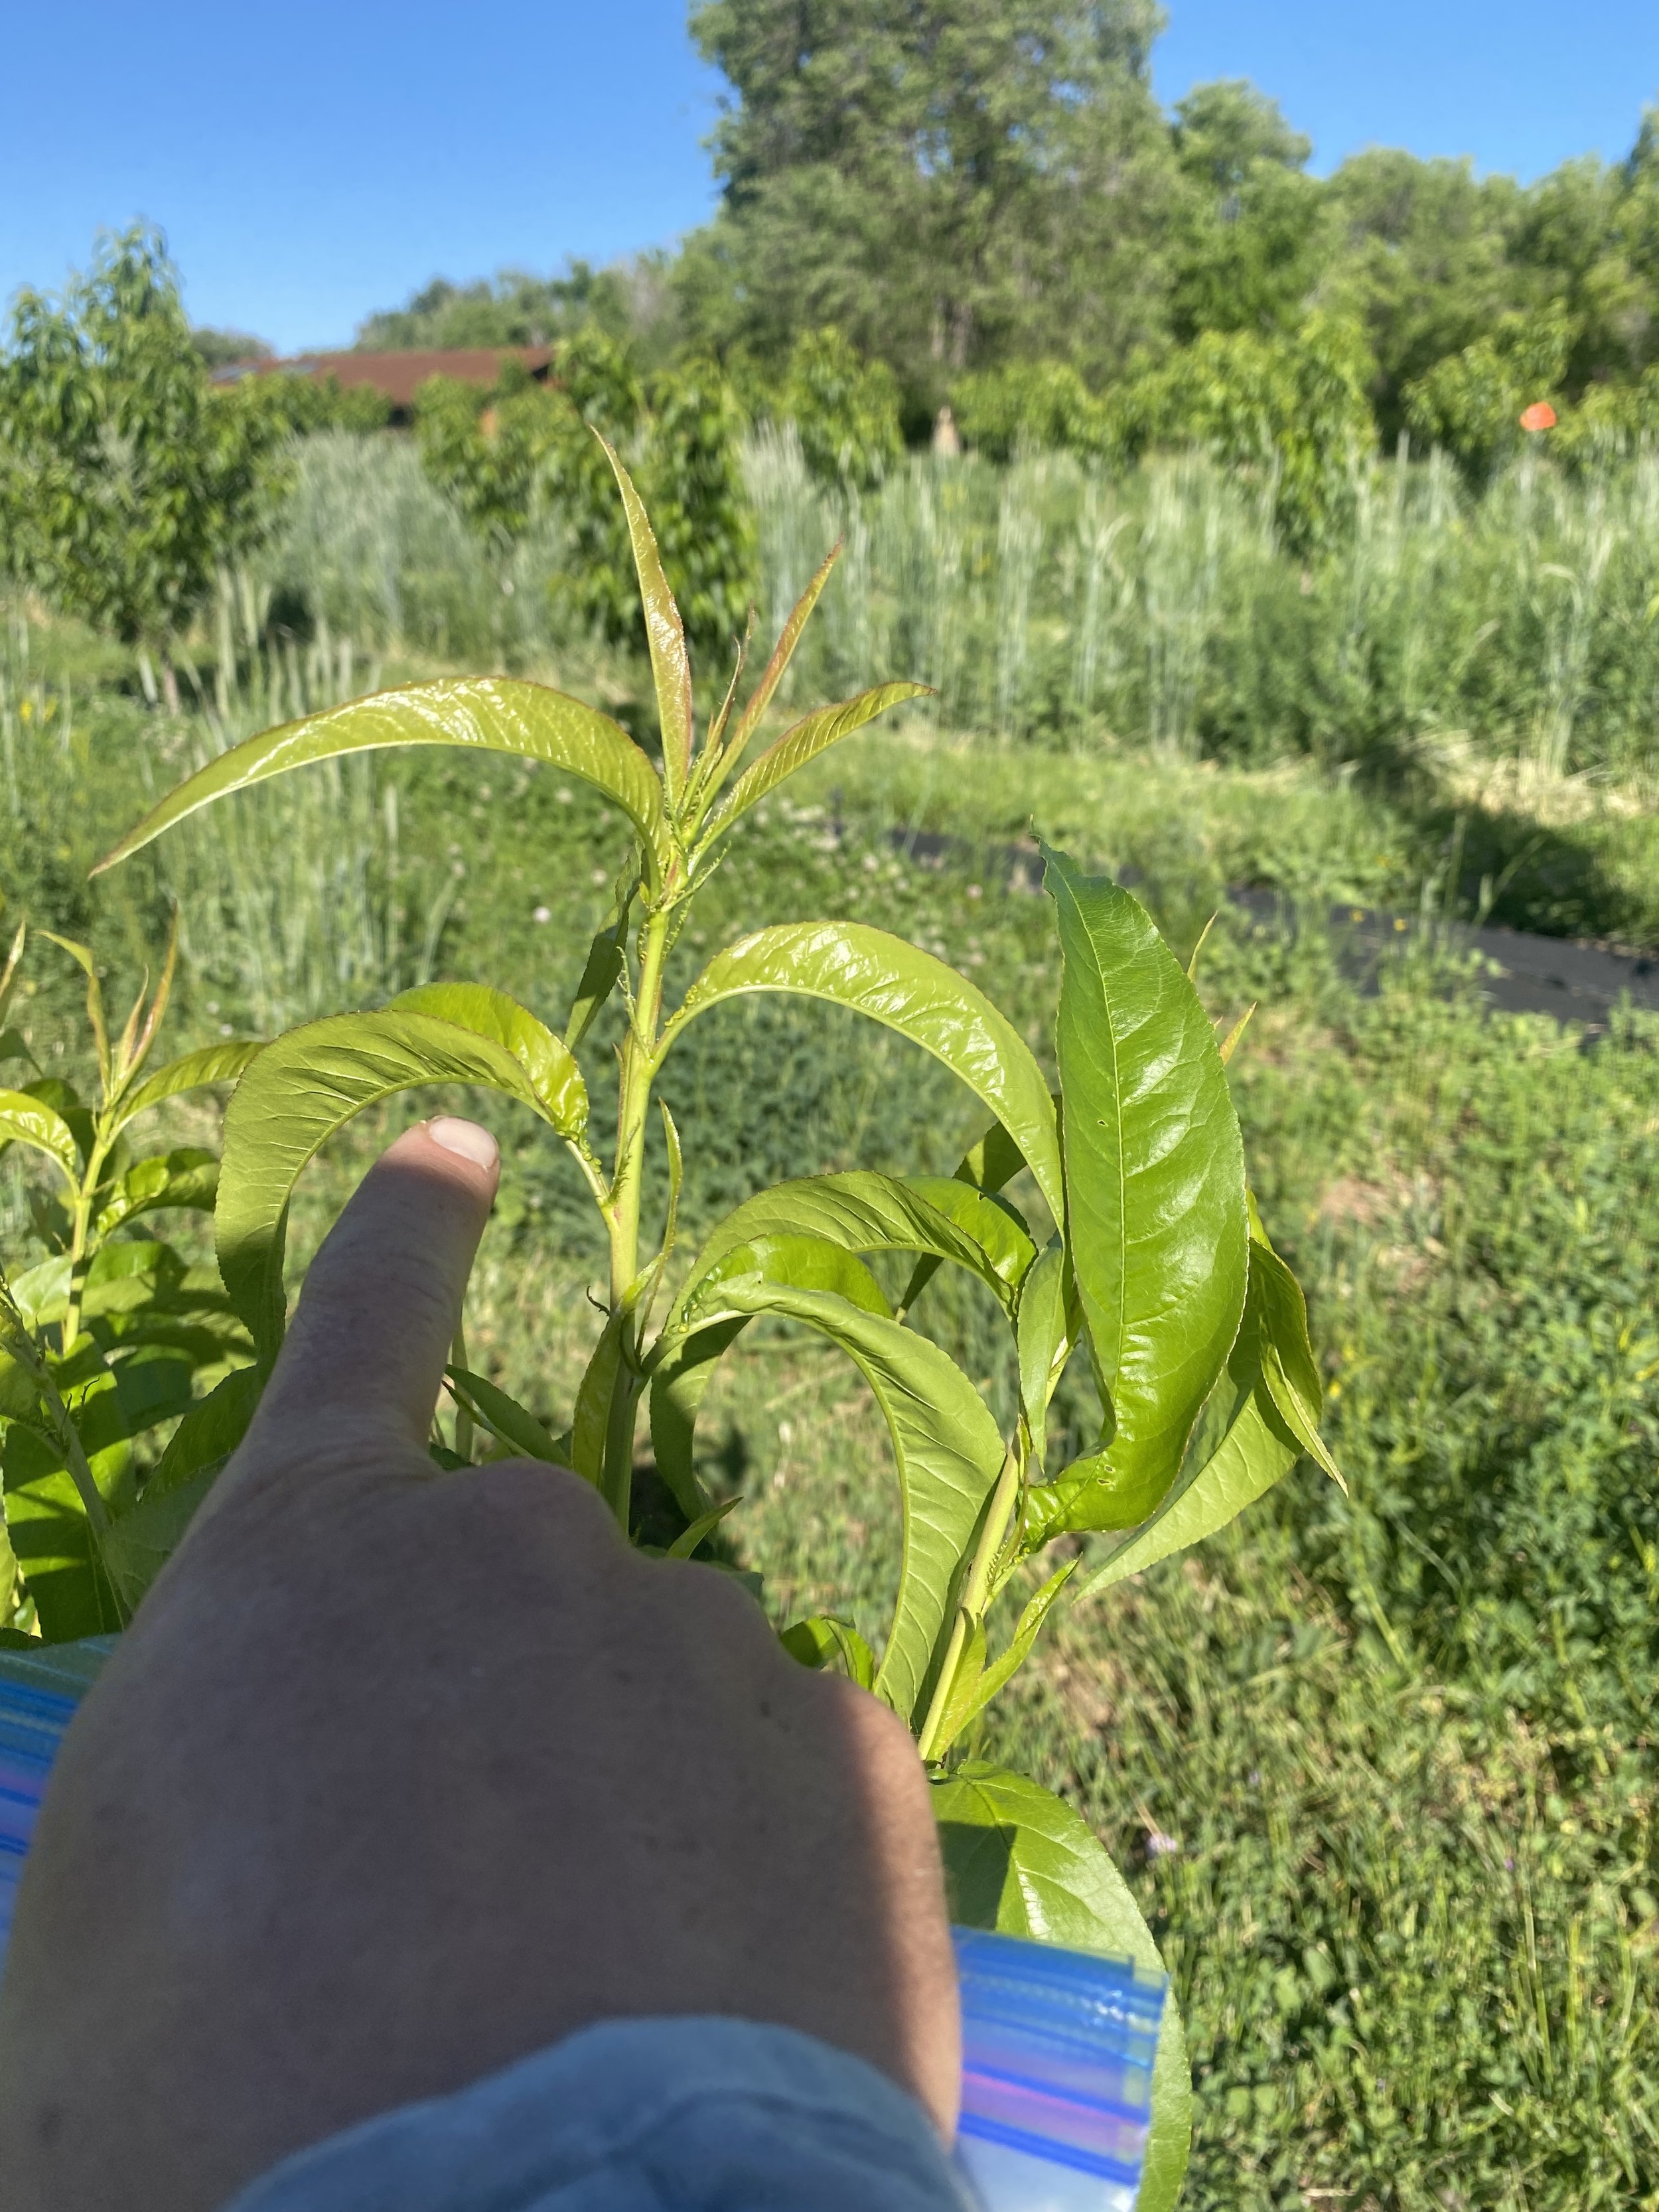
This is the leaf I'd pull for the "new growth" on a sap test. I might even go one or two more leaves down the stem. The reason I didn't in this case is because two leaves lower and I've almost reached my "old growth".
Minimize time in the mail. I’ve found that flat rate USPS shipping is usually sufficient, and I send samples Monday or Tuesday so they don’t get stuck over the weekend. Optimize this by tracking shipments and adjusting on the next sample.
Ship with a disposable ice pack. I also use a padded envelope for extra insulation. I send one to two samples at a time each week in a small flat-rate padded envelope. I repeat this weekly, alternating blocks and cultivars.
Take samples before 9am. If indoor, pull leaves 1 hour after the start of a light cycle. Pull at the same time each time you sample.
Fill two separate Ziploc bags, one with new leaves and one with older leaves. Fill the first bag with young but fully developed leaves. Fill the second bag with the oldest but still vital leaves (don’t sample yellow leaves). Push or suck the air out of the bag after filling to avoid evaporation.
For each sample, pull leaves from as many plants as realistic within the block being tested. The more plants, the better.
Avoid the outer rows of the greenhouse or field, and the first and last 10 yards of a row.
Ensure the leaves are as clean as possible—dew, dirt, dust, and fertilizers will affect the test drastically. If you recently applied a nutrient foliar spray, use distilled water to clean the leaves and pat-dry them.
Sample leaves of average quality (abnormal plants should be skipped or tested separately in a side-by-side test).
Sample from the same side of the plant if there is a sunny/shady side of the plant.
Avoid rain or dew on the samples—dry them off with paper towel if necessary.
6. Attempting DIY Sap Analysis
There are a few reasons not to perform DIY plant sap analysis using refractometers, Horiba meters, and other devices.
DIY measurement involves extracting something beyond “sap”. If you are crushing leaf tissue and testing the liquid, that is not technically sap. If it’s green, you’re seeing the chloroplasts and other cellular constituents that go beyond just xylem/phloem and cytosol fluids.
DIY measurement techniques do not provide enough information. Nutrients are often too high/low based on the levels of other nutrients. For example, nitrate may be too high because molybdenum is too low, or because sulfur is too low. You won’t know without knowing the levels of all nutrients.
The time is takes to get all of the necessary nutrients for proper analysis will take far too much time that could be spent on more important tasks in your operation. Outsource for greater efficiency.
Good luck.